Posted by Jerry on August 11th, 2024 — Posted in Journal
After a decade of different projects, I’ve decided to circle back in this direction and focus a bit on my writing — hence Lost Biro — where I will be testing writing ideas, and generally experimenting. While I work away behind the scenes here preparing a new look and format, I also write about mindful travel on
thefogwatch.com
So, why not join me over there while I set things up here 🙂
Comments Off on You might see some changes here…
Posted by Jerry on March 19th, 2013 — Posted in Journal, Photography
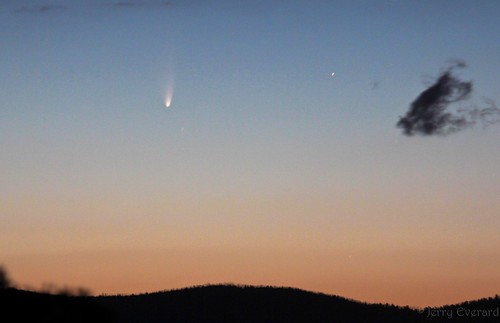
This photo of comet PAN-STARRS was taken on 8 March. The comet was named for the PAN-STARRS observatory array in Hawaii where it was discovered as c/2011/L4. It took a couple of days trying, but I got there. And here’s how: I went up to Mt Stromlo armed with binoculars – about half an hour before sunset. This way I could set up in daylight, pre-focus the lens on a distant horizon and then wait for the comet to appear.
The setup was a canon 60D with a 100-400mm f/4.5-5.6 canon zoom lens, mounted on a tripod, with a remote release.
I used mirror lockup to reduce vibration to a minimum – and turned off the image stabilisation. You see, the thing is, that if the camera is mounted solidly on a tripod, then the image stabilising gyro will actually introduce vibration – so turn it off if you’re using a tripod.
I scanned the sky about a hand span above the horizon after the sun set. Towards the end of twilight I was rewarded with the sight of a faint light smudge – which in binoculars resolved into the definite comet shape you see here.
Settings:
I used a 4-second exposure at f5.6 on ISO400 and a zoom of 275mm – so you could get the same photo with a 300mm kit lens. You could also get a pretty good image with a 200mm lens.
Now that the comet has shifted to the Northern hemisphere – there is now an opportunity for those in more northern countries to grab a similar shot
Good hunting! And why not comment with links to your photos? I’d love to see them 🙂
Cheers
Jerry
Comments Off on Comet PAN-STARRS 8 March 2013
Posted by Jerry on May 6th, 2012 — Posted in Journal
With the moon presenting its closest approach this year coinciding with the full moon I couldn’t resist heading up to Mt Stromlo – next to the observatory – in Canberra Australia. Sure enough it arrived on time at about 5.14pm. Where to look? I used the compas app on the phone to identify where the moon would rise, and got into position a few minutes before moonrise.
Most images were taken through a 300mm zoom on a canon 60D DSLR. It was tripod mounted and I used a remote trigger. A little fill light and sharpening in Adobe Lightroom completed the pictures.
Comments Off on supermoon May 2012
Posted by Jerry on April 1st, 2012 — Posted in Journal, Photography
Dawn is traditionally one of the two ‘golden hours’ for photography. Over the next few weeks I will upload a couple of photos and talk about techniques and my approach to the subject. I’m no expert and would appreciate feedback along the way 🙂
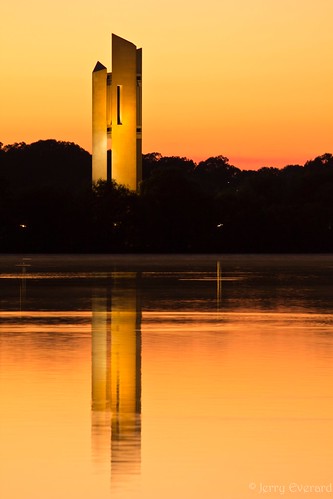
The subject of this photo may look like a modern take on a fortress but this is a musical instrument – one of the few full chromatic carillions – a computerised bell suite that can play tunes – often ringing out over Lake Burley-Griffin.
Seen at dawn – the tower was bathed in a golden light. I positioned it on the third, and decided to include its reflection in the still lake to provide a point of interest.
The image was captured on a canon 60D at 1/6th of a second. ISO200 200mm/f4.5. Camera was tripod mounted and I used a remote trigger and live-view mode to reduce vibration.
I then imported the image into Adobe lightroom where I gave it just a tiny bit of sharpening before exporting to jpeg and uploaded via iPhoto.
Next time you find yourself up just before dawn – how about taking advantage of the special light – and share your work in the comments below 🙂
Cheers
Jerry
Comments Off on Photography: Carillion in Canberra – a study in reflections
Posted by Jerry on March 4th, 2012 — Posted in Journal
I’ve always liked the steampunk style – so I thought it was time to add some functional goggles with flip-down magnifiers. I’m happy to share a step-by-step how-to, but a lot will be self-explanatory.
Essentially they are welding goggles. I removed the ventilators and lens holders and sprayed the bright yellow shades black.
Then I removed the lenses from the holders and sprayed the holders and ventilators with an old-gold paint.
Finally I bought a couple of cheapo plastic magnifiers that were about the right diameter and replaced the dark welding shades with the magnifiers, after cutting off the handles – these were glued in place and when the paint had dried I reassembled the whole thing, and this is the result. I was quite pleased with the result!
Comments Off on steampunk goggles