Many of you will have been following my progress on building a pochette or travel fiddle on my other blog
After a total of about ten days work spread over about six weeks I now have a pochette! They said it takes ages to learn how to make a violin – they were right – I must’ve studied violin making for at least three hours, reading the whole book from cover to cover (ok looked at the pictures…).
Bit of work on the bandsaw, the drill press and the angle grinder and there it was…
And quite suddenly the instrument was finished.
As I tightened the strings I could hear that at least some of my wild guesses were right, and I was rewarded with a warm sound almost as loud as a normal violin. In fact it is as loud as my Maggini copy. That was my first surprise. The second was that with the first tuning up the wood moved to accommodate the strain and the strings quickly went out of tune. But after a couple of hours it stabilised and I was rewarded with quite a reasonable sound at good volume. Not too bad for a first attempt!
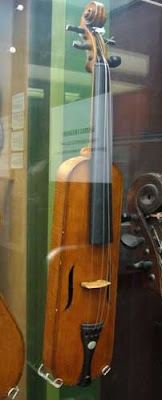
Here is the instrument that inspired mine
And finally – what does it sound like? I’ll let you be the judge!
Yes I’ve been neglecting this blog a little, but grab a cuppa because this is really neat 🙂
It was my birthday recently and a pleasant surprise arrived right on time from the USA. It was a package – tantalisingly box-like
When I opened it, out came a package of metal bits and a reassuringly large instruction manual from Graham Industries – a detailed working live steam model engine. It is a single-cylinder, double acting engine with a stephenson link reversing gear – the sort you get on steam trains.
I borrowed a beading tray from Sharon to prevent the loss of small parts – the bolts are tiny and in good scale with the engine.
And so I set to work on the assembly. The manual opened with a lovely line drawing showing the relationship of components and separate drawings of the valve gear
The cylinder and piston assembly was first – and the manual was well illustrated with step-by-step photos. The package even included proper paper gaskets to ensure proper sealing.
Then came the valve gear – a slide valve that would move up and down to reveal the ports in sequence
Then it was time to assemble the frame
The crankshaft followed with the valve eccentrics, the beautifully machined brass flywheel, and the connecting rod was added to the crank-pin
And finally the engine was complete. The detail is fantastic. Each of the bolts holding moving parts runs in a brass bushing to minimise friction, and the engine runs on fairly low pressure air or steam.
Here is the completed engine.
I did a test run first using a tiny air compressor run off my car’s cigarette lighter, and it ran briefly before one of the bolts vibrated loose on the reversing gear. This was fixed with a light dab of loctite, and then I adjusted the valve timing lightly (yes it is fully tunable!) until it ran well in both directions from the air compressor.
But a steam engine isn’t a steam engine unless it runs on steam is it? So, not having a boiler to hand I went for the next best thing – a milk steamer from a cappucino machine – it had a steam valve to act as a throttle, and with a couple of bits of clear plastic tubing (fuel line) I stepped down the size so it would fit on both the milk steamer and the engine. And within moments, the engine ran smoothly – without the harshness I found running it on air – and without the problem of possibly setting off the smoke alarms!
Posted by jerry on March 10th, 2008 — Posted in DIY, Woodwork
Not my room (pity) but I thought this was a wonderful challenge to set a woodworker. It seems that a person in the US bought a whole room’s worth of Jacobean seventeenth century English oak wood paneling at auction and has commissioned a woodworker to get it ready for installation. Trouble is, it’s been stored for years in separate components and needs to be re-assembled and adapted to fit a completely different room – for the second time.
William Randolph Hearst the eccentric publisher apparently bought the paneling from an old country estate in the UK and shipped it to the USA. When the Hearsts auctioned off a pile of stuff in 1998, the paneling was among the goods sold.
Enter Woodwkr blog – the author of which has been given the challenge (!) of fitting this paneling in a new setting. His blog describes the process of sorting, digitising, designing and where necessary making new components to match, and getting the whole lot ready for installation.
The latest post has a great story of how he came up with an idea to get the panels so sit flat for installation.
Comments Off on Seventeenth century room panelling installation
Posted by jerry on February 26th, 2008 — Posted in DIY, Journal, Woodwork
So you spin firestaffs and your transport is a motorbike eh? Bit long for the backpack? Ok here is the solution – firestaffs with removable ends. At least that was the design brief I was given. The key thing was to have matching firestaffs each of 900mm length but able to break down to a maximum of 600mm length. In rough terms in the old measurements that is two firestaffs of three-foot length, but breaking down to 2 feet maximum length.
The key tool here was a plumbers flaring tool and a hammer. I bought a couple of lengths of aluminium tube and one length of a slightly oversize aluminium tube – the one able to slide freely over the other.
The thinner tube I cut to 600mm (24 inches), the thicker tube I cut four pieces 200mm (8 inches). I then cut four short pieces of the thinner tube – about 100mm (4 inches) and used the flaring tool to expand ONE end so they would not slide all the way down the wider tube. I filled these with dowel shaved to fit. Then I inserted the shortest tubes into each of the wider and longer short tubes and drilled them for the wick.
Using 300mm of wick on each (one foot) I attached the wick wound tightly to the short ends. Once all four wicks were screwed tight with screws and washers, I slid these over the long tubes. There was a bit of slack so I wound a little tape around teh top of the long tubes so the fit would be snug.
Then I drilled two holes at rght angles through the short and long tube so they would match and bolted them together with 25mm 3/16″ bolts. This secures them so they won’t wobble even if the packing tape is worn away.
I also marked each end cap with the correct end by punching tiny dents on both the long staff and the short caps. That way the bolt holes will line up easily even if you haven’t drilled them perfectly evenly.
And that’s that – two matching collapsible fire staffs – Enjoy them safely.
Posted by jerry on February 20th, 2008 — Posted in Travel, Writing
Think of a newspaper and look at the headlines – perhaps you have very little time in your day – a well-crafted headline can peke your curiosity and make you read further. It’s the same with blog titles. If you are writing a travel blog, you are less likely to read a post that declares : “My trip to Singapore”. But if instead your title was “Five top shops in Singapore” – wouldn’t you just quickly check out the list? People love lists. There are whole books of them.
Or what about a question? “Why are Tokyo’s drain covers so pretty?” Again you’d be reading that post pretty quickly – if only to disagree with the answer.